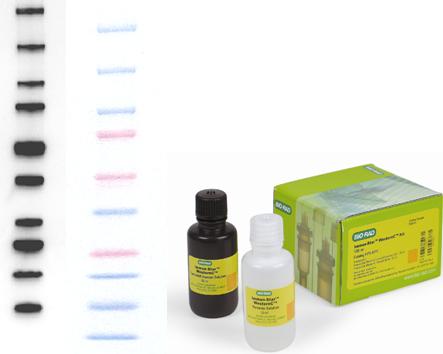
A large amount of heat will be generated during the transfer process, so there is a certain limit to the electric field strength. The Joule generated in the transfer is proportional to the power supply parameter P, P = I * V = I 2 R. The temperature of the electrophoretic transfer buffer increases as the Joule heat increases, and its resistance decreases significantly. The reduction in resistance will cause a change in the transfer process and electric field strength, which will affect the buffering capacity of the electrotransfer buffer. At the same time, overheating of the system can also cause damage to the gel or adhesion to the blotting film. Therefore, the heat dissipation capability of the tank directly affects the electrophoretic transfer efficiency. The amount of protein strip protein loaded under chemiluminescence : 80μg separation gel concentration: 12% Related instrument and reagent ordering information 170-8182 XciteBlue Conversion Screen and viewing goggles for SYBR Green/SYBR Safe/GFP/Flamingo Fluorescent Gel Stain 170-8184 Gel Alignment Templates 170-7950 White Light Transilluminator, universal hood 170-5070 Immun-Star WesternC Chemiluminescent Kit, including 50 ml luminol/enhancer, 50 ml peroxide solution 161-0376 Precision Plus Protein WesternC Standards, 250 ul, 50 applications WesternC pre-dyed standard effect picture and chemiluminescence imaging effect picture Bio-Rad Western blotting solution Sodium Gluconate,High Quality Sodium Gluconate,Sodium Gluconate Details SHANDONG BAISHENG BIOTECHNOLOGY COM , https://www.baishengbioproducts.com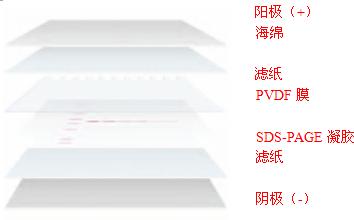
This room is mainly transferred by wet transfer, so this article describes the application of chemiluminescence and ChemiDoc XRS in the case of wet transfer.
First, transfer film (wet transfer):
(1) Two sheets of 6.5*10cm filter paper and one 5.5*8.5cm PVDF membrane are required to transfer a film. Always wear gloves when cutting the filter paper and film, as the protein on your hands can contaminate the film. The cut PVDF membrane is immersed in methanol for not less than 15 minutes before use.
(2) A clip for a transfer film, two sponge pads, two filter papers, and a immersed PVDF film were placed in an enamel pan to which a transfer liquid was applied.
(3) Open the clip and place the black side into the transfer liquid. Put the sponge, filter paper, separation gel, PVDF film, filter paper and sponge from bottom to top.
Note: 1 The whole process is carried out in the transfer liquid. When each layer is laid, the air bubbles are used to scrape the bubbles. In particular, there must be no air bubbles between the glue and the film.
2 When the glass plate is stripped, the action should be light. Use a scraper to gently scrape off the concentrated glue. Carefully peel off the separation rubber cover on the filter paper, and adjust it by hand to align it with the filter paper. (4) Combine the clip and place it on the transfer. In the groove, the black side of the groove is to face the black side of the groove, and the white side of the clip faces the red face of the groove. When the electric power is turned on, heat is generated, and there is a large gap on one side of the tank, and the ice box prepared in advance is placed to cool down. Place the entire electrophoresis tank in a large container (the best plastic foam box is best), filled with ice.
(5) 250 mA constant flow film for 2 hours.
(6) After 2 hours, the film was taken out and the film was washed with TBST for 5 minutes.
(7) Block with 5% skim milk powder at room temperature.
Blocking is to allow antibodies to bind only to specific proteins rather than to membranes.
Skim milk powder should be configured with TBST and sealed in a clean container and sufficient to cover the membrane.
2. Incubation of primary antibody The primary antibody was solubilized with BSA, and the antibody was diluted according to the requirements of the antibody specification (most dilution 1:1000), overnight at 4 °C. It is also possible to appropriately lengthen or shorten the time depending on the amount of the antibody and the amount of antigen on the membrane.
(Some primary antibodies can be satisfactorily incubated for one hour at room temperature)
3. Incubate the secondary antibody for 1 hour at room temperature. The HRP-labeled secondary antibody is generally used, and the dilution ratio is 1:2000.
The dilution ratio of the secondary antibody should not be too low, otherwise it will easily lead to non-specific binding.
Note: Always wash the membrane three times with TBST before incubating the secondary antibody for five minutes each time.
The washing is to wash away the non-specific binding of the secondary antibody, and the washing effect directly affects the depth of the background of the result, so the washing must be clean.
IV. Exposure The laboratory uses Wiglas's “Western Luminescence Detection Kitâ€, which uses Bio-Rad's Immun-Star WesternC Chemiluminescence Kit (which has been optimized for CCD imaging) for better results.
(1) Wash the membrane, 2 to 3 times, 5 minutes each time. (2) Add a little water to the plate of the film by the glue meter, and take a plastic wrap with a suitable size on the plate to spread the bubbles.
Role: a Ensure that the PVDF membrane can be exposed on a relatively clean platform to avoid contamination.
b After the plastic wrap is applied, the background color is pure black and the depth is uniform, so that when the translucent PVDF film is illuminated by the Marker under white light, it will be clearer and more obvious.
(3) Put the film into the glue meter, adjust the brightness, size, and focal length. Mark the mark in the destination strip and mark it with a ballpoint pen.
(4) Select EPI WHITE light, click “White Epi IIIumination†and click Auto Expose to get the marker image, maximize the image, select the image, select file -> export to jpeg, adjust the maximum value to 100, and save to the folder. After saving to jpeg format, go to other computers and edit the image with other image software even if the quantity one software is not installed.
(5) Mix the luminescent liquid A and B liquid in a 1:1 ratio and pour it on the PVDF membrane. The luminescent liquid can cover the membrane and turn off the WHITE EPI light (note that the position of the membrane starts from Marker, do not change Click "Chem Hi Sensitivity", click "Live Acquire" to select the appropriate exposure time, number of sheets, select the specified folder, save.
Select a satisfactory picture and convert to jpeg format as described above.
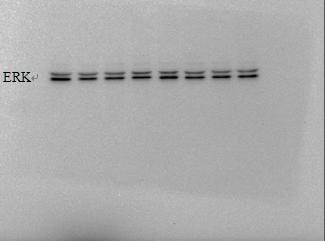
For example, Caveolin-3, AKT, ERK, GSK, etc. are better exposed, can be adjusted to 10s, generally within 10 can get good results. Others that are not easy to strip out can be extended in time.
For the internal reference, let the luminescent liquid rest on the membrane for 20-30 seconds before the first exposure, sometimes the desired effect will be obtained.
(6) Comparison of marker and destination strip: use the “picture and fax viewer†software provided by window to open the marker image in jpeg format, and use your hand to mark the mark just drawn with a ballpoint pen on the screen. At this time, also use the "picture and fax viewer" to open the picture of the destination strip in the jpeg format, where the hand point is the position of the marker.
Marker image obtained under white metering 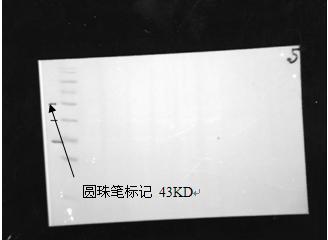
The amount of protein strip protein loaded under chemiluminescence : 120μg separation gel concentration: 12% 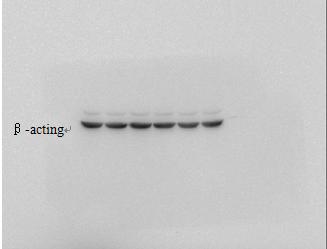
Marker image obtained under white metering 
Marker image obtained under white metering 
The amount of protein strip protein loaded under chemiluminescence : 50μg separation gel concentration: 15% 
Conclusion: The bio-Rad cold CCD chemiluminescence imaging system for chemiluminescence detection is simpler than the traditional darkroom exposure method, and the experimental time is greatly shortened. However, it is necessary to pay attention to selecting a suitable chemiluminescent reagent during imaging to suit the imaging detection of the CCD . Most of the chemiluminescent reagents correspond to the darkroom exposure mode. Therefore, it is necessary to adjust the detection. For example, the luminescent liquid cannot be diluted, and the stock solution must be used. At the same time, if the expression of the band is weak, such as the use of common illuminating liquid may require longer imaging time, of course, a better way is to choose a chemiluminescent reagent that can quickly generate a strong signal, such as Bio-Rad 's Immun- Star WesternC Chemiluminescence Kit.
170-8251 Molecular Imager ChemiDocXRS+ System PC 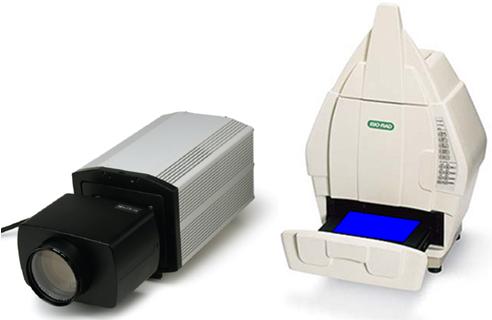
High-sensitivity chemiluminescence technology application experience
High-sensitivity chemiluminescence technology application experience
Huang Lei
one. Overview
ChemiLuminescence (CL) is a kind of molecular luminescence spectrometry. It is based on the principle that the concentration of the analyte in the chemical detection system and the chemiluminescence intensity of the system are linear and quantitative under certain conditions. A trace analysis method for determining the content of a test substance by using an instrument to detect the chemiluminescence intensity of the system. The essential difference between chemiluminescence and other luminescence analyses is that the source of luminescence (optical radiation) absorbs different sources of energy. The system produces chemiluminescence and must have a photoradiation reaction that produces a detectable signal and a chemical reaction that provides a single reaction step that provides sufficient energy for the luminescence phenomenon at a time.
Chemiluminescence Western hybridization is a highly sensitive alternative to isotope detection. The enzyme-labeled antibody replaces the radiolabeled antibody and, when it acts on the substrate, produces an optical signal. Most specific antigen detection methods are based on horseradish peroxidase (HRP) or alkaline phosphatase (AP) secondary antibody conjugates. Signals can be acquired by photographic film or dedicated imaging equipment. Chemiluminescent substrates have been used in immunoblotting for more than a decade. At present, most laboratories use chemiluminescence technology for detection. With the development of cold CCD chemiluminescence detection technology, more and more laboratories are now using the cold CCD gel imaging system for chemiluminescence detection. Although film imaging is more sensitive than natural light, it has many disadvantages. : Time-consuming, darkroom, developer and film are required, and the film is expensive and is a consumable item that needs to be purchased continuously. At the same time, since the linear range of the film is narrow, it is almost impossible to quantify the strip on the film (especially the strip with a lower expression). Cold CCD technology has the advantages of instant image processing, high sensitivity and high resolution, and wide dynamic range compared with X film, so it can accurately quantify the strip. Of course, this technique requires the substrate to produce a signal of high intensity and long duration to ensure that the signal can be captured by the cold CCD gel imaging system. In this regard, a number of companies have provided corresponding chemiluminescent substrates or kits, especially the Western-C chemiluminescence detection kit provided by Bio-Rad, which produces high-intensity sustained light signals for 24 hours. Users can perform multiple exposures with a minimum detectable value of 10 -19 mol, which is combined with Bio-Rad's award-winning chemiluminescence imaging system ChemiDoc XRS or VersaDoc system for high quality imprinted signals.
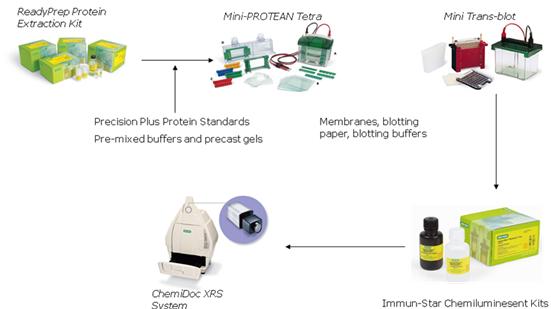
Our laboratory has been using Bio-Rad's ChemiDocXRS for chemiluminescence detection since 2005. At present, a relatively mature technical route has been formed, and a large number of experimental data have been obtained. This article will share with you the key steps of Western Blotting and some of the experience with ChemiDocXRS.
two. Transfer process
There are many methods for transferring proteins, the most common being electrophoretic transfer methods, which are fast, efficient, and maintain the high resolution of proteins in gels. Electrophoretic transfer technology refers to the process of transferring proteins separated in a gel to a blotting film carrier. Because this technology can transfer proteins onto the membrane accurately, quickly and efficiently, and can maintain high resolution of protein in gel, it is widely used in transfer blotting technology.
The commonly used electrophoretic transfer system has a groove transfer system and a semi-dry transfer system. The former is to immerse the gel and the blotting film in the transfer buffer tank, and then apply voltage for transfer; the latter is to place the gel and the blot film. A sandwich structure is formed between the filter papers, and then transferred between the electrode plates. The comparison between the two systems is shown in Table 1.1.
Table 1.1 Comparison of electrophoretic transfer systems
Slot transfer
Semi-dry transfer
flexibility
Flexible choice of voltage setting, transfer time and cooling method; flexible electrode position change (Trans-Blot and Trans-Blot Plus)
Fast, high-intensity transfer, use a small amount
Electrotransfer buffer, no cooling system
Quantitative and qualitative results
Small molecular weight range can
Provide efficient and quantitative protein transfer
Small molecular weight proteins rarely bind to blotting membranes,
Transfer occurs and penetrates the blotting film
Molecular weight range
Wide molecular weight range
For transfer efficiency with a molecular weight greater than 120kD, the small molecular weight protein will transfer through the blotting membrane.
Transfer time
It can extend the transfer time to 24h without depleting the buffer; only 15-60min for high-intensity transfer
Fast transfer; not suitable for time delay transfer
temperature control
The cooling core and circulating cooling water can be transferred at a very low temperature (4-10 ° C).
For example, original enzyme transfer
No cooling system
Buffering capacity
Buffer 10-12L (Trans-Blot) or 450ml (Mini Trans-Blot) buffer does not limit transfer time
A small amount, only 250ml per experiment,
Save reagent costs and reduce transfer time
During electrophoretic transfer, the gel and blotting membrane are placed in parallel between the two poles, see Figure 1.2. According to Ohm's law:
V=I*R, R is the resistance value of the substance between the two poles (ie, the resistance value of the transfer buffer, the gel, the blotting membrane, and the filter paper). When a voltage is applied to both ends of the electrode, it will be generated between the above substances. Current, protein sample transfer occurs.
Since the electric field strength (V/cm) between the two poles is the driving force for protein transfer, the voltage and distance between the two poles is called the key parameter of protein transfer on the gel. Other parameters, including the size and shape of the protein, the amount of charge carried, the pH of the electrotransfer buffer, viscosity, ionic strength, and gel density also affect the electrotransfer efficiency of the protein.
ChemiDoc XRS system
Next Article
Beef ham processing